Updated · By Peter Kovalsky
How to Make Google Slides Play Automatically and Loop
To make Google Slides play automatically, start the slideshow, move the mouse so the control bar appears in the bottom-left corner, and click the ⋮ menu. Choose Auto-play, pick a speed such as Every 10 seconds, tick Loop so the deck starts again after the last slide, then click Play. The slides now advance on their own and go round until you stop them.
That works for a screen you set up yourself. If the deck needs to run somewhere you are not, or you want a link that plays and loops the moment someone opens it, use File → Share → Publish to web instead and tick its two options: Start slideshow as soon as the player loads and Restart the slideshow after the last slide.
This guide covers both, step by step, plus the limits people run into: one speed for every slide, settings that reset, and videos that get cut off. Steps follow Google’s help on presenting slides and publishing files, and what we saw in Google Slides on a computer on 25 October 2026, using a 50-slide test deck. Google renames menu items from time to time, so the wording on your screen may differ slightly.
Which method to use
| Auto-play in the slideshow | Publish to web | |
|---|---|---|
| Best for | A screen you start yourself: a lobby TV, a stand at an event, a classroom while students arrive | A link or web page that should play by itself on any device |
| Who can set it up | Anyone who can open the slideshow | Owners and editors of the file |
| Speeds we saw | Every second, 2, 3, 5, 10, 15, 20 or 30 seconds, or every minute | Every second, 2, 3, 5, 10, 15 or 30 seconds, or every minute |
| Loop | Loop in the Auto-play menu | Restart the slideshow after the last slide |
| Remembers your settings | No: set them again every time you present | Yes: the settings are part of the published link |
| Who can see it | Whoever is in front of the screen | Anyone with the link, so think before publishing |
| Needs internet | Yes, unless the deck is set up for offline use | Yes |
Both use one speed for the whole deck. Neither lets one slide stay up longer than another, which is covered further down.
Method 1: Auto-play and Loop in the slideshow
- Open the presentation and click Slideshow in the top-right corner. To start from the first slide, use the arrow next to Slideshow and choose Start from beginning, or select slide 1 in the filmstrip first.
- Move the mouse. A small control bar appears in the bottom-left corner, with the slide number between two arrows.
- Click the ⋮ at the end of that bar. The menu lists speaker notes, the laser pointer, the pen, full screen and Auto-play.
- Hover over Auto-play. A list of speeds opens, from Every second to Every minute. Click the one you want; a tick moves to it. On our test account Every 2 seconds was ticked to begin with.
- Open Auto-play again and click Loop at the bottom of the list. On a short window you may need to scroll that list to see it.
- Open Auto-play once more and click Play at the top. The deck starts moving.
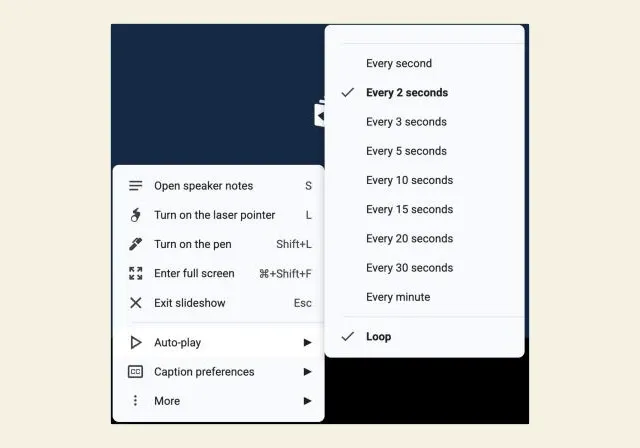
To make it fill the screen, choose Enter full screen in the same ⋮ menu (the shortcut shown was ⌘+Shift+F on a Mac).
What we saw when we tested it
- Loop goes back to the start. With Loop ticked, we started Auto-play on slide 50 of 50. Three seconds later, with the speed at two seconds, the slideshow had already wrapped round to slide 2, and it carried on to slide 3.
- Pressing an arrow key stops it. When we pressed the left arrow during Auto-play, the deck went back one slide and then stayed there for the next nine seconds, with the speed set to two. To start again, choose Auto-play → Play. Plan for this on a public screen: anyone who touches the keyboard stops the loop.
- Settings don’t survive leaving the slideshow. After we exited with Esc and started the slideshow again, Loop was no longer ticked. Google’s help says to re-set the auto-advance options each time you present. Make it the last thing you do before you walk away from the screen.
Method 2: Publish to the web so it plays and loops by itself
Publishing gives you a link (or an embed code for a website) that opens the deck in a player. The player can start and loop without anyone clicking.
- Open the presentation and choose File → Share → Publish to web.
- On the Link tab, pick a speed under Auto-advance slides. The default is every 3 seconds.
- Tick Start slideshow as soon as the player loads, so nobody has to press play.
- Tick Restart the slideshow after the last slide. This is the loop.
- Click Publish and confirm. Copy the link that appears and open it on the screen that will show the deck.
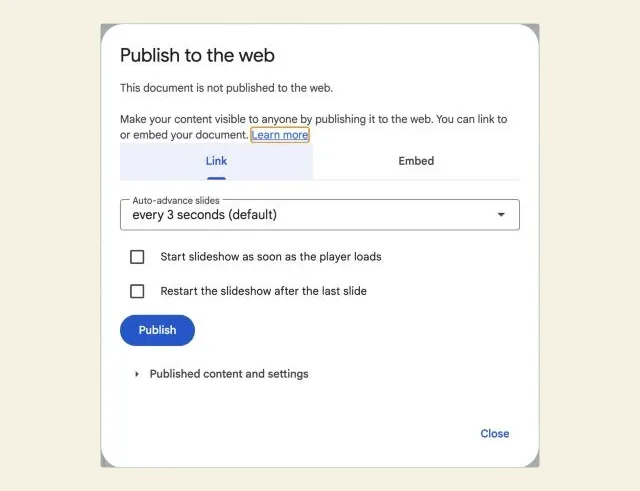
To put the looping deck on a website instead, use the Embed tab. It has the same speed and the same two tick boxes, plus a Slide size: Small (480x299), Medium (960x569), Large (1440x839) or Custom. Paste the code it gives you into your site.
Four things to know before you publish:
- It’s public. Anyone with the link can see the slides, including slides you meant to keep for yourself. Remove anything private first, or publish a copy (File → Make a copy) that holds only the slides for the screen.
- Edits show up, timing doesn’t. Google says changes to the deck update the published version automatically. But the speed and the two tick boxes are fixed in the link: Google’s presenting help says to copy a new link if you change the timing.
- It may be switched off. Only owners and editors can publish, and on a work or school account your administrator might have turned publishing off. If the menu item is missing or greyed out, that is the likely reason.
- You can undo it. In the same dialog, open Published content and settings and click Stop publishing.
Publishing is the better choice when the screen is a smart TV browser, a digital sign that only takes a web address, or a page on your school or company site. The published player is made for viewers: it plays the slides and nothing else, which suits an unattended screen.
Give one slide more time
Both methods give every slide the same time. If your title slide needs 20 seconds and each photo needs five, you have three honest options:
- Duplicate the slide. At five seconds a slide, four copies of the title slide in a row keep it up for 20 seconds. Select the slide and choose Slide → Duplicate slide. With no transition between the copies, viewers won’t see a change. It’s crude, but it works with both methods.
- Use a timer code on that slide. The Slides Timer Chrome extension, made by an independent developer, can advance a slide when its countdown reaches zero. It needs the extension on the presenting computer and doesn’t work with Publish to web. Our guide to adding a timer to Google Slides explains the code.
- Pick a speed that suits the busiest slide. If the slowest reader needs 15 seconds for your longest slide, use 15 seconds for all of them and keep the other slides light.
Slide transitions don’t change this. A transition sets how one slide gives way to the next, not how long it stays up; see Google Slides transitions for the details.
Videos and music in a looping deck
A video set to Play (automatically) in its Format options starts when its slide appears, as our guide to adding video to Google Slides explains. We found nothing in Google’s help saying that auto-advance waits for a video to finish, so assume it doesn’t: choose a speed at least as long as your longest video, put the video on duplicated slides as above, or trim the video to fit. Then watch one full loop.
Background music is set the same way: insert it on the first slide, set it to start automatically, untick Stop on slide change and tick Loop audio. Our guide to adding music to Google Slides has the full steps. Check what the music does when the deck goes back to slide 1; that’s the moment most likely to surprise you.
Example: a reception-screen loop
Hypothetically, a school wants a welcome loop on the TV in its reception area during an open day. The deck has 12 slides: a welcome, eight photos, a map and two slides of times.
- At Every 10 seconds, one full loop takes two minutes, about as long as a visitor waits at the desk.
- The two timetable slides have more text, so each is duplicated once and gets 20 seconds.
- There are no videos and no sound, so nothing depends on the speakers or the timing of a clip.
- The office computer connected to the TV has its sleep and screen-saver settings switched off for the day. If it sleeps, the loop stops.
- Someone starts the slideshow at 8:30, sets Auto-play to 10 seconds, ticks Loop, clicks Play, chooses Enter full screen, and moves the keyboard out of reach.
If the TV had a browser of its own, they could skip the computer: publish a copy of the deck with the same speed and both tick boxes, and open the link on the TV. Our guide to showing Google Slides on a TV covers the ways to connect a screen.
When you’re presenting, don’t auto-advance
Auto-play is for a deck that runs without a speaker. In a live talk it works against you: the slide moves while you are still talking about it, or sits there after you have finished. You also lose it the moment you press a key.
If what you really want is to move freely around the room without going back to the laptop, use a remote instead. Copresent turns your phone into a Google Slides remote that shows your speaker notes too. The host installs the Copresent Chrome extension on the presenting computer and signs in with Google; there’s no app to install on the phone. You advance when you’re ready, not every ten seconds.
To pace yourself without auto-advance, keep a countdown for your talk where only you can see it.
If it isn’t working
| Problem | Likely cause | Fix |
|---|---|---|
| You can’t find Auto-play | The menu is only in the slideshow, not the editor | Start the slideshow, move the mouse, and click ⋮ in the bottom-left corner |
| The control bar disappears | It hides when the mouse stops moving | Move the mouse to bring it back |
| Loop isn’t in the list | The list is cut off in a short window | Scroll the Auto-play list, or make the window taller |
| The deck stops at the last slide | Loop or Restart the slideshow after the last slide isn’t ticked | Tick it; in the slideshow, set it again each time you present |
| It played, then stopped | Someone pressed a key or the slideshow was restarted | Choose Auto-play → Play again; keep the keyboard out of reach |
| The published link waits for a click | Start slideshow as soon as the player loads wasn’t ticked | Publish again with it ticked and use the new link |
| The published link has the old speed | Timing is fixed in the link | Change the setting and copy the new link |
| Publish to web is greyed out or missing | You only have view access, or an administrator turned publishing off | Ask the owner, or ask your administrator |
| A video gets cut off | Auto-advance moved on before the video ended | Use a longer speed, duplicate the slide or trim the video |
| The loop stops after a while | The computer slept or the screen saver started | Turn off sleep and the screen saver on that computer for the day |
Check before you leave it running
- The slideshow is on the right deck and starts from slide 1.
- The speed gives the busiest slide enough time, and longer slides are duplicated.
- Loop (or Restart the slideshow after the last slide) is ticked, and you have watched the deck come back round to the start once.
- Any video or music behaves the way you expect on the second loop, not just the first.
- The computer won’t sleep, and nobody can bump the keyboard.
- If you published it, nothing private is in the deck, and you know where Stop publishing is.