Updated · By Peter Kovalsky
Google Slides Transitions: Add, Change and Time Them
To add a transition in Google Slides, click the slide you want to move to in the left-hand filmstrip, then choose Slide → Transition. A Motion panel opens on the right. Pick an effect from the drop-down under Slide transition, drag the slider to set its speed, and click Play to preview it. To use the same transition throughout the deck, click Apply to all slides.
That’s the whole job for most decks. The rest of this guide covers the details people get stuck on: which slide a transition belongs to, what each of the eight effects looks like, how fast “Fast” really is, how to remove transitions, and the timing question that the speed slider doesn’t answer — how long each slide stays on screen.
Steps follow Google’s help page on transitions and animations and what we saw in the Slides editor on a computer on 25 October 2026. Google renames menu items from time to time, so the wording on your screen may differ slightly.
Transition or animation?
A transition is the effect between two slides: how one slide gives way to the next. An animation moves something within a slide, such as a bullet point appearing on a click. Both live in the same Motion panel, which is why they get mixed up.
If you want a list to appear one line at a time, or an answer to stay hidden until you reveal it, you want an animation, not a transition. Our Google Slides animations guide covers those reveals. This guide is only about the move from slide to slide.
Add a transition to one slide
- Open the presentation on a computer. You need edit access.
- In the filmstrip on the left, click the slide you want the transition to lead into. A transition set on slide 5 plays as the deck moves from slide 4 to slide 5.
- Click Slide → Transition. In our check the toolbar also had a Transition button that opens the same panel; when the window is narrow it can be hidden behind the ⋮ at the end of the toolbar.
- In the Motion panel, under Slide transition, open the drop-down. It shows None on a slide with no transition.
- Choose an effect. The slider for speed and the Apply to all slides button appear under it.
- Click Play at the bottom of the panel to preview it in the editor.
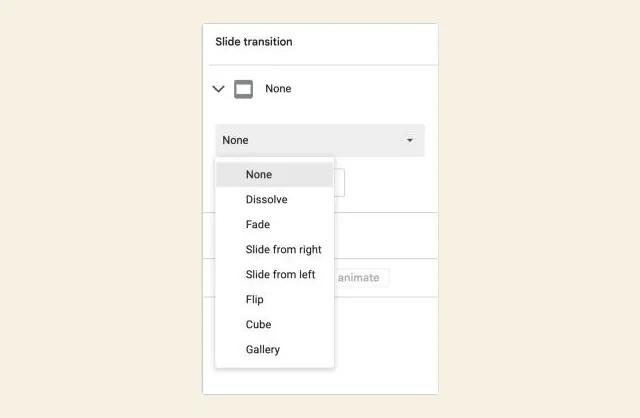
The panel shows the transition for whichever slide is selected, so you can click through the filmstrip with it open to check or change each slide in turn. Changes save as you go, like any other edit in Slides.
The eight transitions, and when to use each
When we checked, the drop-down offered None plus seven effects. The descriptions below are short summaries, so click Play to see each one on your own slide before you commit; the “use it for” column is our advice, not Google’s.
| Transition | What it does | Use it for |
|---|---|---|
| None | The next slide replaces the last one instantly | Most slides in most talks |
| Dissolve | The old slide dissolves into the new one | A soft change between related slides |
| Fade | The old slide fades out as the new one fades in | A quiet signal that a new section starts |
| Slide from right | The new slide pushes in from the right | Steps in a process, a timeline moving forward |
| Slide from left | The new slide pushes in from the left | Going back to an earlier point, or a “before” slide |
| Flip | The slide turns over like a card | A reveal, such as a question then its answer |
| Cube | The slides rotate like faces of a cube | Rarely; it is the most noticeable effect |
| Gallery | The slides move sideways, like flicking along a row of pictures | Photo sets or a run of examples |
A good rule is to pick one quiet transition (Fade or Dissolve) for section changes and leave everything else on None. A new effect on every slide makes the audience watch the motion instead of the content, and a deck where every slide cubes into the next feels long by slide ten. If you want a bigger effect, save it for one moment where the change of slide means something, such as flipping from a question to its answer.
Apply a transition to every slide
With an effect chosen, click Apply to all slides in the Motion panel. The effect and speed on the current slide are copied to every slide in the deck.
This overwrites any transitions you set slide by slide, so do it first and then change the exceptions. For example, set Fade on every slide, then go to your section-divider slides and set them to Slide from right, or go back to slides that should change instantly and set them to None.
Google’s help page describes setting transitions one slide at a time and doesn’t mention a way to apply one to a hand-picked group of slides. If you want the same effect on, say, five slides out of thirty, set it on each one.
Change the speed of a transition
The slider under the effect controls how long the transition takes. It is labelled Slow, Medium and Fast, with no number shown.
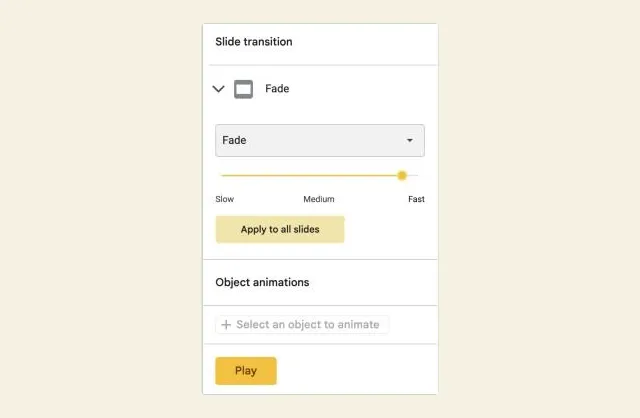
When we picked Fade, the slider started near the Fast end, and the panel’s screen-reader label read 0.5 seconds. So “Fast” is about half a second; dragging toward Slow makes the effect take longer. We didn’t measure the slowest setting.
Half a second is a sensible default. Longer transitions feel dramatic once and slow every time after that, especially if you click through a section quickly. If you slow one down, rehearse that slide: you’ll want to wait for the transition to finish before you start talking about the new slide.
The speed is set per slide, like the effect. Apply to all slides copies the speed too.
Remove transitions
- From one slide: select it, open Slide → Transition, and choose None in the drop-down.
- From every slide: choose None on one slide, then click Apply to all slides. In our check the button stays available with None selected.
Removing a transition doesn’t change anything else on the slide, including its animations.
Time your slides: what transitions can’t do
The speed slider sets how long the change of slide takes, not how long a slide stays on screen. Google Slides has no setting to give each slide its own duration, such as 20 seconds for the title and two minutes for the chart. Every slide waits for you to advance it.
There are two ways to make slides move on by themselves, and both use one speed for the whole deck:
- Auto-play in the slideshow. While presenting, open the ⋮ menu at the bottom-left of the slideshow and choose Auto-play. When we checked, the speeds ran from Every second to Every minute. Our timer guide shows that menu and explains why it can’t time an activity.
- Publish to the web. File → Share → Publish to web lets you choose how quickly the slides advance in the published version, according to Google’s publishing help. It produces a public link, and work or school administrators can turn publishing off.
For step-by-step setup of both, including how to make the deck loop, see how to make Google Slides play automatically and loop. Your transitions still play when the deck advances by itself. If one slide needs more time than the others, the honest answer is to present it yourself, or to duplicate that slide so it stays on screen for two auto-play steps.
For a live talk, the timing that matters is yours: how long you spend on each slide. Keep a countdown for your own pacing off the slides, and leave the transitions short enough that they never eat into it.
Rehearse with the device you’ll present from
Transitions don’t play in the editor while you click through slides; they play in the slideshow, or when you press Play in the Motion panel. So the only real check is a run-through in slideshow mode.
Do one full pass before the talk, advancing the way you will on the day: the keyboard (see our Google Slides keyboard shortcuts), a clicker, or a phone. Watch for two things:
- Double advances. If you press next before a slow transition finishes, check whether you skipped a slide. Shorten the transition if it happens.
- The audience view. On a video call or a second screen, a heavy effect can stutter where it looked smooth on your laptop. If you are presenting over a call, check what people actually see; our Zoom presenting guide covers that setup.
If you advance with your phone, Copresent turns it into a remote for Google Slides with your speaker notes on the same screen, so you can look up at the room instead of the laptop while the slides change. The host installs the Copresent Chrome extension on the presenting computer and signs in with Google; anyone invited to co-present just opens a link. Transitions are part of the slideshow running on the laptop, so rehearse once with the phone to confirm each transition has finished before you start the next point.
Example: a 12-slide training deck
Hypothetically, a team lead has a 12-slide training session with three sections, and wants the deck to feel tidy without distracting from the content.
- They select slide 1, open Slide → Transition, choose Fade and leave the speed at its default, then click Apply to all slides.
- Slides 5 to 7 are a step-by-step process. They set each of those to Slide from right, so the steps visibly move forward.
- Slide 11 is a quiz answer that follows a question on slide 10. They set slide 11 to Flip.
- They present the deck once from slide 1, advancing with their phone, and notice Flip takes long enough that they start talking too early. They drag its slider closer to Fast and run slides 10 to 11 again.
Every effect has a job, and most slides still just fade.
If a transition isn’t working
| Problem | Likely cause | Fix |
|---|---|---|
| The transition plays on the wrong slide change | It’s set on the slide before the one you meant | Transitions play as the deck moves into a slide; set it on the destination slide |
| Nothing happens when you change slides in the editor | Transitions don’t play while editing | Click Play in the Motion panel, or start the slideshow |
| Every slide got the same effect by mistake | Apply to all slides copies the current slide’s effect everywhere | Set the exceptions again slide by slide, or use Edit → Undo straight away |
| You can’t find Transition in the toolbar | The window is narrow and the button is hidden | Use Slide → Transition, or the ⋮ at the end of the toolbar |
| You want a list to appear line by line | That’s an animation, not a transition | Use Object animations in the same panel; see the animations guide |
| Slides don’t move on by themselves | Transitions only control the change, not the timing | Use Auto-play in the slideshow, or Publish to web with an advance speed |
| You can’t open the Motion panel | You only have view or comment access | Ask the owner for edit access, or make a copy with File → Make a copy |
Check before you present
- Every transition is set on the slide it leads into.
- One quiet effect for most slides, and a reason for every exception. For the rest of the deck’s look, see how to make Google Slides look good.
- No transition slower than you are willing to wait for, every time.
- A full run-through in slideshow mode, advancing with the keyboard, clicker or phone you will use.
- If the deck must run by itself, Auto-play or Publish to web is set up and tested; transitions alone won’t move it.